Tag Archives: Auckland

Monthly Catch up

Feb 2018 to March 2018

I have been away in CHCH with work so work on ANZAC has slowed down somewhat. In saying that a number of tasks have been completed.

  1. Portholes removed
  2. Glass removed
  3. Duck board removed
  4. Caulking removed
  5. More sanding
  6. Mast and cross-member sanded

I have added a door to the end of the boat shed due to the 2 storms which it the North Island – no damage done. Pictures below.

Sanding, scraping, vacuuming

20180103_180348Up to January 15, 2018

Update over Christmas and the New year period. Went for a week holiday to Fiji so not much done at all. Have however I removed the brass trim and started sanding the exterior. A bit of work to do here but the attachment to the grinder is working well and removing paint quickly.

It is all creating a lot of dust which is covering everything – the vacuum is getting a work out.

The upper deck levels where it has been glassed over looks as thought the glass is in very good condition, so may only need a light sand and patches where it is damaged and then a re-paint should do it.

I have also removed on of the port side glass panes, came out easily enough, these will all require re-glazing.


Pits and pieces

Update to 13 December 2017

Have completed the walkway platform around the boat, and am underway with the final strip out/off.

Removing brass trims, and fittings now we have a dry working area.

Have cleaned off the last of the moss etc. and dismantles the skylight. Back canopy doors have been removed (she looks like a different boat without these sliding doors).

Covers Going On!

Sunday 12.11.2017

Finally the weather has started to calm down and some fine days have come along. With Terry’s help we managed to get two tarpaulin’s on the frame and secured down. Another couple of days like this we will be back onto working on Anzac properly!

20171113_083236

20171113_083130

The whole structure has been anchored to the ground by straps and large water filled drums – there will be 4 straps with 8 drums in total – one every second truss.

I decided to drape the tarpaulin’s over as opposed to along the structure – I figure I will save myself the cost of hiring a hoist to get the last tarp on.

20171113_083223

Boat Shed Continued

23 October 2017

The rain has continued – the result being only a few hours of work on the shed over the long weekend. Terry came around and helped me install the last of the bracing (4 bays). Stopping and starting between showers. During the week I also picked up the plywood which will form the floor.

We are now ready for the cladding to go up – hopefully the rain and wind will stop and we have a clear run to finish the temporary shed.

Weekly Update – Boat Shed

October 2nd – 8th

With some time off and a break in the weather, I was able to spend some time on constructing the boat shed.

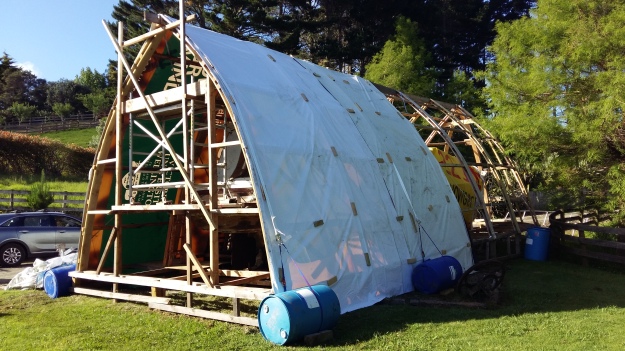
Firstly I had purchased some 220L plastic drums – 8No – which I intend to fill with water and use as weights to help secure the shed to the ground (as this is only a temporary structure). – I will show how this is to be done later.

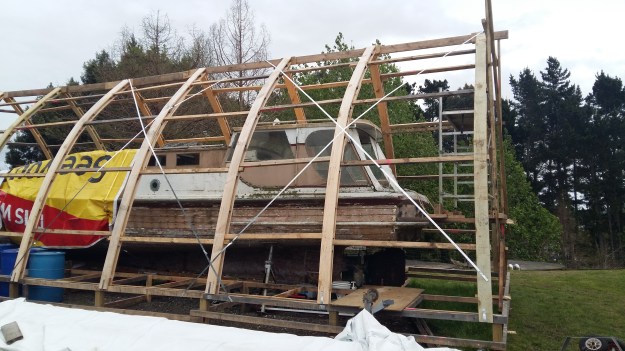
I built a temporary platform to give me access to the last 2 trusses. I built the trusses and installed these all in one morning then continued framing out the floor ready for plywood.

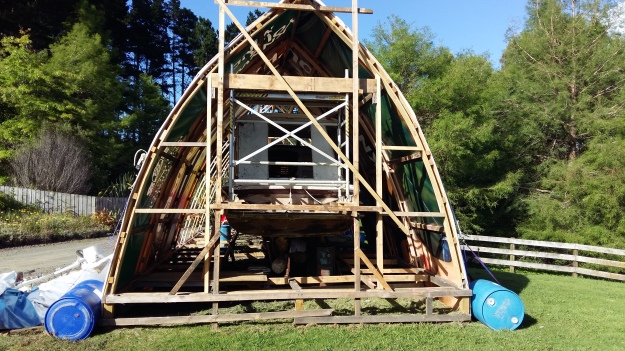
The front curve frame was next – framed this up to give me enough space to be able to work around with sufficient room, dismantled the truss template and re-used these materials.

Started adding the strip bracing until I ran out of materials – have ordered some more so will complete the bracing this week.

20171007_181712

Jobs to complete the boat shed include;

  1. Install balance of bracing
  2. Frame out for plywood floor
  3. Install plywood flooring
  4. Frame end wall, with door opening and ventilation (Make doors)
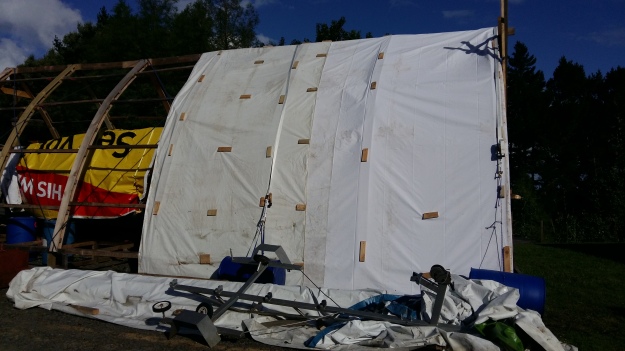
  5. Install coverings – tarps to go on
  6. Install “tie downs” with weights


More Boat Shed Construction

Thursday 28.09.2017

Have managed to complete the floor framing on the port side, and construct and erect two more trusses complete with purlins. Also installed the nail plates across the top of the paired trusses – effectively fixing them together. Also cleaned up and sorted the remaining timber – so more room to maneuver the cars now.

Boat Shed Floor

Sunday 25.09.2017

Started framing out the port side shed floor, ready to take the plywood floor, will repeat the process on the starboard side. Also dropped into the timber merchants and purchased the last of the truss material – 4 more to go.

Boat Shed Progress

29-30 July 2017 – as luck would have it, the weather has cleared up – forecast for both Saturday and Sunday clear blue sky’s! Perfect – but timing off. Busy all weekend with family, birthdays lunches etc.

I did manage 2-3 hours on the Saturday afternoon to complete the base framing and measure out the top plate for the arches – cut and fixed plate to the arch already in place. Have the template now for the remainder which I can prepare on the ground.

Managed to install a few of the trusses and get part of the ridge board up.

Also had a “Jesus moment” and managed to put a nail through my finger.

Temporary Boat Shed – continued

22 July 2017

Saturday was taken up with rough water boat handling with the Coastguard Kaipara Unit I belong to – out on the bar – good stuff, short sharp swell up to a meter or so in height, we had all had enough come 1300. Even the seals with their pups had taken shelter behind South Head.

23 July 2017

Sunday – Rained on and off all day until I had had enough about 1500 – I worked on my own and continued framing up the base of the temporary boat shed. The posts are all down, just need to complete the bracing and frame the floor out ready to receive the plywood topping.

I picked up more screws and some nail plates to hold down the trusses during the week, fixed one to the truss already in position. Will need to space the remaining trusses around the opening for the motor when it is re-installed – want to be able to open the roof up drop the motor in and close it all up again.

The western end (front) of the shed I change the design to take one truss at 90 degrees to the others – creating a curved end as opposed to a flat one – this has saved some space.