Tag Archives: Boat Repairs

Boat Shed Progress

29-30 July 2017 – as luck would have it, the weather has cleared up – forecast for both Saturday and Sunday clear blue sky’s! Perfect – but timing off. Busy all weekend with family, birthdays lunches etc.

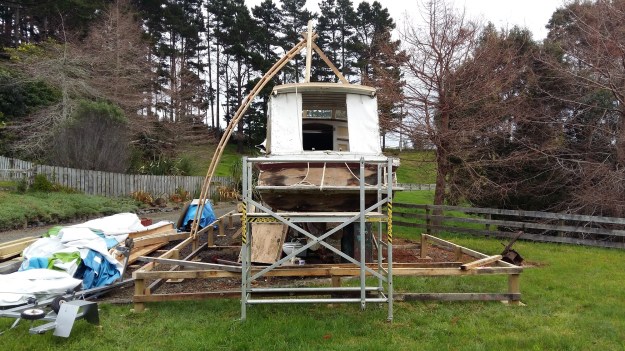
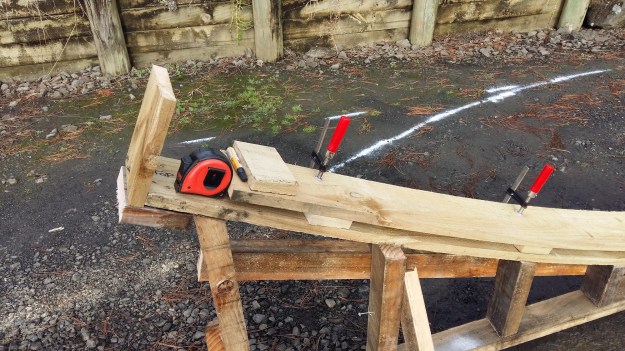
I did manage 2-3 hours on the Saturday afternoon to complete the base framing and measure out the top plate for the arches – cut and fixed plate to the arch already in place. Have the template now for the remainder which I can prepare on the ground.

Managed to install a few of the trusses and get part of the ridge board up.

Also had a “Jesus moment” and managed to put a nail through my finger.

Temporary Boat Shed – continued

22 July 2017

Saturday was taken up with rough water boat handling with the Coastguard Kaipara Unit I belong to – out on the bar – good stuff, short sharp swell up to a meter or so in height, we had all had enough come 1300. Even the seals with their pups had taken shelter behind South Head.

23 July 2017

Sunday – Rained on and off all day until I had had enough about 1500 – I worked on my own and continued framing up the base of the temporary boat shed. The posts are all down, just need to complete the bracing and frame the floor out ready to receive the plywood topping.

I picked up more screws and some nail plates to hold down the trusses during the week, fixed one to the truss already in position. Will need to space the remaining trusses around the opening for the motor when it is re-installed – want to be able to open the roof up drop the motor in and close it all up again.

The western end (front) of the shed I change the design to take one truss at 90 degrees to the others – creating a curved end as opposed to a flat one – this has saved some space.


Temporary Boat Shed – Progress

18.07.2017

More progress on the temporary boat shed, the rain stopped for a few days allowing me to manufactured 7 of the 14 timber trusses, using the template I made the previous weekend – ran out of stainless screws will get some this week.

I had 2 boards crack on me when bending them – generally where there are knots in the timber. I have used the lengths anyway but made sure they made the inside panel – then secured another shorter section over the crack to reinforce it – looks as though these will be fine.

Progress is also under way on the perimeter platform with the framing starting to take shape.

20170717_161403

I am going to re-design the front of the temporary shed – will make it curved rather than flat, I will save on one or two trusses and it will not take up so much room – the bow is thin anyway so there will be loads of room at that end of the structure.

I will also change the ridge connection detail to make it simpler to install – will post some photographs when I get a chance.

I managed to get one truss up late yesterday – to see how it looks and to make sure there is enough head room to lift the rear cabin roof an extra 200mm.

20170717_161339

Stock pile of timber – will be using it all!


20170717_161412

20170717_161335

20170717_161456

Temporary Boat Shed Part 2

Has been a while – busy at work, and the weather has been constantly wet.

I have not bee slacking though. I have purchased and had delivered the first lot of timber to construct the temporary boat shed (last week).

Over the weekend we built the template for the arches – see the attached pictures. It is easier to bend the frames by simply standing on them. I marked out where the packers are to go and put a stop end on – this will allow me to make the apex match on each arch.

Now to make 12 sets of arches.

Again the timber was too wet to cut some of the larger lengths of wood – first casualty was my old skill saw (22 years old) cooked the motor – so time to get a new one.

20170702_140945

20170702_140926

20170702_140929

20170702_140937

20170702_140918


Temporary Boat Shed

I have had a quiet few weeks, with rain, birthdays etc. ANZAC has had to wait. In the mean time after searching for a design for a temporary cover solution I came across an example which I have developed further.

The design I settled on was similar to a traditional pacific island building, two 1/4 arches meeting a ridge board at the top, down to an edge board, and covering with old billboard sheets. I have also included a plywood platform to be installed around the inside – this will give me a better working height (as ANZAC is packed 500mm off the ground) as well as a clean platform.

I have started on one of the arches as a trial to see how it will work – will provide pictures in another post of the progress.

Below are the sketches I came up with – am now looking around the materials.

OptionsFrameDetails

Rib Review and Demolition

13 May 2016

Spent a few hours on ANZAC over the weekend, wanted to review the number of ribs which need replacing. Now that the inside has been stripped out it was much easier to inspect.

The result was that most of the ribs port and starboard in the front section require replacement with fewer towards the stern.

Summary as follows;

  • 30No ribs first section
  • 26No ribs second section
  • 14No ribs third section
  • 4No ribs fourth section

Total required 74No.

Spent the rest of my time removing the blocks (where boards have been butted up to each other.

This revealed the spot where I think she had been taking on water. Also broke out the multi tool and trimmed off some plugs on the inside of the stern quarter which had been annoying me – looks tidier now.

20170513_161535


Bulkhead Removal

30.04.2017

Decided to remove the bulkheads surrounding the engine bay, the bulkhead to the toilet need to go anyway and the other bulkhead has been hacked around so much that there was no reason to keep it.

With the help of Terry, both walls came out relatively easily, the last of the floor where the fuel tank sat required the grinder.

We finished off the day removing the hydraulic arm and scrapping the cockpit. all this uncovered more ribs which need replacing – will mark these up record lengths and get the materials ordered.

20170501_072702

Internal Cleaning

23.04.2017

Once again Terry came round – we continued on the interior. Terry vacuumed from the stern through to the bow in sections as I scrapped out the years of mud and silt around the engine bay. The paint that was water blasted off last week had dried enough to be hovered up. Will need to spray some degreaser around and have another water blast from stem to stern – any paint left will have to be scrapped or sanded.

Not long now and we will be ready for rib replacement 🙂

I have decided to remove the internal bulkheads around the engine and toilet area, the original panels have been cut up so much that I don’t think they are worth saving – will replace with similar paneling. (I will keep some of the off cuts as these can be used to repair the rear bulkhead).

Picture quality not the greatest.

Interior paint scraping

26 March 2017

After a bit of a delay in proceedings (weather, family and the refurbishment of a  8 seat dining suite, and chest of drawers) we (Terry and myself) were back into scrapping the interior hull. A lot of the paint below the floor is coming off by just running the vacuum over the flaking paint, the harder paint requires a bit of persuasion from the paint scraper.

Looks like decades of muck has accumulated in the interior – cant wait to get to the engine bay!